
Making quilts can be easy and fun using pre-cut fabric packs.
What are Charm Packs and Layer Cakes?
Charm packs are pre-cut squares you can get in various sizes, usually 5 inches or smaller. Layer cakes are usually 10 inch squares. Using these speed up the quilting process so that you don't have to spend time cutting and can get straight to sewing.
This is a great way to get started sewing and quilting. You'll spend less time cutting fabric, and have plenty of practice sewing with 1/4 inch seam allowances.
Let's Sew a Quilt!
In this video tutorial, I'll show you how to quickly piece together a quilt using charm packs and layer cakes.
Keep scrolling for materials used and some general notes.
Supplies
Tools needed:
- 1/4" Sewing Foot (most machines come with one)
- rotary cutter
- pins (optional)
- quilting ruler (optional)
Fabric needed:
- (2) charm packs of 5" squares
- (1) coordinating solid color charm pack of 10" squares
General Instructions
Refer to video for details.
I used the 5 inch charm pack and sewed 3 rows of 3 squares. This will result in a patchwork block of 9 small squares total. Next, I cut squares the same size as my patch work block out of the solid black to create a larger square.
Here is an example of what you'll end up with:
|
Patchwork Block - Make 6 |
Solid Block - Cut 6 |
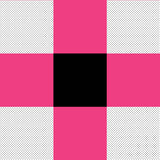

In the end, you will have (6) patchwork blocks and (6) solid color blocks.
For the first row, sew together a patchwork block, solid block, patchwork block, in that order. Repeat this pattern for the third row.
Here is an example of Row 1 and Row 3:
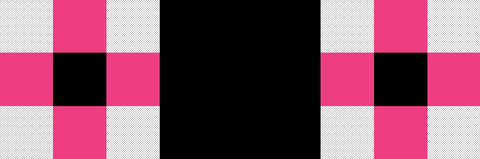
For the second row, sew together a solid block, patchwork block, solid block. Repeat this pattern for the fourth row.
Here is an example of Row 2 and Row 4:

You should now have 4 rows.
Piece together each row in order, Rows 1-4. Refer to video for tips on how to lay seams flat and avoid bulky seams.
Once you've completed these steps, your first quilt top is done! This finished quilt is about 41" x 55". You can make it larger by sewing fabric strips along the sides, top, and bottom.
Hope you enjoyed this tutorial!
We'd love to see your completed projects! Tag us on Instagram @sewcutebykatie!
Let us know what other tutorials that you'd like to see!
See all of my latest projects and tips on Facebook, Instagram, or YouTube to get your sewing inspiration!
XOXO,
Katie Bertrand
PS. Don't forget to follow me on Pinterest!